Friday, November 18, 2011
File Operation-Copy , move , rename and delete a file or folder in SSIS
SSIS File Operations – Copy File, Move File, Rename File and Delete File
Create SSIS Project
First we need to create an SSIS Project before starting with SSIS File Operations, you can create a SSIS Project . Let’s say we created an SSIS project as FileOperations.
Copy File:
We can copy file from one place to another with the help of SSIS. We will look into the whole process of copy file from one place to another in this section, for this you need a New Package in your project which you can create easily . Now we have a SSIS project namedFIleOperations, it is the time to create a package in our SSIS project. Add a new package and name it as CopyFile.
Adding File System Task in Your Package
Now we have a package and it is time to add File System Task to your package, to add File System Task control to the package go to control flow times in toolbox and double click on File System Tasks or drag and drop it in your package(See the image below).

Configuring File System Task
Now we have File System Task control added to your package and we can configure it. To configure right click on the control and choose edit(See the image below).

After that you will be navigated to a new window named File System Task Editor in which you have to configure the File System Task(See the image below).

The options on File system task editor are as below.
- IsDestinationPathVariable : Destination path is stored as variable or not.
- DestinationConnection : File Connection or vairable.
- OverwriteDestination : Overwrite if file exists with same name. True/False
- Name : name you want to give.
- Description : Little description
- Operation : Choose copy file.
- IsSourcePathVariable : Source path is stored as variable or not.
- SourceConnection : File Connetion or variable.
Here we have to choose operation as Copy File choose OverwriteDestination as True and IsDestinationPathVariable and IsSourcePathVariable as False. Now we have to configure Source and destination connections.
Configuring Source and Destination Connections
Now we have to configure source and destination connections.
Source Connection : In File System Task Editor navigate to SourceConnection Tab and choose New Connection(See the image below).

Now you will be navigated to new window named File Connection Manager Editor where you have to configure your source connection. Choose Existing FIle asUsage Type and provide fully qualified path for file which you want to copy to other location(See the image below).

Destination Connection : Once you done with your SourceConnection you have to configure Destination Connection. Go to DestinationConnection tab and choose New Connection(See the image below).

Now you will be navigated to new window named File Connection Manager Editor where you have to configure your destination connection(See the image below).

Here we also have to provide Usage Type & Folder as in Usage Type we choose Existing Folder so we have to provide the destination folder where we want to have a copy of file.
Now you done with both Source and Destination connection and your final File System Task Editor looks like this(See the image below).

Click OK and you are done with your Copy File Task. Save it and execute package as we did in previous post and this will copy specific file from one place to another.
Rename File:
You done with Copy File, we will see the Rename File operation next. This operation will rename any file to the another name you want, for this we need to create a package named Rename. Once you have package added to your project open it and drag and drop File System Task control to your package as we did earlier in this post. Now we will configure that file system task to rename files. For this you have to right click on the package and choose Edit as we did earlier in this post. This will open up File System Task Editor, we have to configure that editor to rename files(See the image below).
We will choose Operation as Rename File(See the image below).

Now we have to configure Source and Destination Connection for Rename File System Task.
Configure Source and Destination Connection :
Source Connection : In File System Task Editor navigate to SourceConnection Tab and choose New Connection(See the image below).

Now you will be navigated to a new window named File Connection Manager Editor and here you have to configure your SourceConnection choose Existing Fileas Usage Type and provide Fully Qualified Path in File(See the image below).

click Ok and your are done with your SourceConnection.
Destination Connection : Once you are done with your SourceConnection you have to configure Destination Connection where you want your renamed file, for this navigate to DestinationConnection Tab and choose New Connection(See the image below).

Now you will be navigated to new window named File Connection Manager Editor and here you have to configure your DestinationConnection choose Create Fileas Usage Type and provide Fully Qualified Path in File(See the image below).

Click Ok and you are done with your DestinationConnection.
Now you will be navigated back to File System Task Editor here click ok and you are done with your Rename File
Move File :
In this Move File Task we will see how to move files from one location to another location. For this we have to add a package name Move in our project and addFile System Task Control to your package by Drag & Drop from ToolBox. Once you have File System Task added to your project you have to configure this to move file by right click and choose edit on File System Task as we did earlier in this post(See the image below).

Now after this we need to configure Source and Destination Connection as we did earlier in this post.
Configure Source and Destination Connection :
Source Connection : In File System Task Editor navigate to SourceConnection Tab and choose New Connection(See the image below).

Now you will be navigated to a new window named File Connection Manager Editor and here you have to configure your SourceConnection choose Existing Fileas Usage Type and provide Fully Qualified Path in File(See the image below).

click Ok and your are done with your SourceConnection.
Destination Connection : Once you are done with your SourceConnection you have to configure Destination Connection where you want to move file, for this navigate to DestinationConnection Tab and choose New Connection(See the image below).

Now you will be navigated to new window named File Connection Manager Editor and here you have to configure your DestinationConnection choose Existing Folder as Usage Type and provide Folder Path in File(See the image below).

Click Ok and you are done with your DestinationConnection.
Now you will be navigated back to File System Task Editor here click ok and you are done with your Move File Task.
Delete File:
Delete File Task is used to delete specific file from the specific location. For this we need to create a new package by name delete in our sample project and add File System Task control to your package by Drag & Drop it from ToolBox. Once you have File System Task added to your package Right Click on File System Task and choose Edit to configure it to delete files from a specific location. Now we get File System Task Editor window on our screen choose Delete File as operation in File System Task Editor window(See the image below).

Now we have to configure Source Connection for this from where we like to delete files.
Configure Source Connection :
Go to SourceConnection tab in File System Task Editor and choose New Connection(See the image below).

Now you will be navigated to a new window named File Connection Manager Editor and here you have to configure your SourceConnection choose Existing Fileas Usage Type and provide Fully Qualified Path in File(See the image below).

Thursday, November 17, 2011
SQL Server:How to import comma delimited or CSV file into table?
Load CSV file in sql server 2005/2008 using bulk insert
This a very common question asked by the developer .
How to load CSV file into SQL Server Database Table? How to load comma delimited file into SQL Server?
Here I am giving you the step for that
step1
create a table as per your need

step2
create your csv file from where you want to import or load data into your table
and save it on some path like c:\employee.csv

step3
now use the following sql command in query analyzer
BULK
INSERT employee
FROM 'c:\employee.csv'WITH(FIELDTERMINATOR = ',',ROWTERMINATOR = '\n')GO
hope this help you a lot
Tuesday, November 15, 2011
Saving changes is not permitted (SQL Server 2008)
While creating and editing a database in SQL server 2008 I soon ran into a brick wall, or a 'by design' feature of the Database Management Studio.
When you design a table in a database and then try to make a change to a table structure that requires the table to be recreated, the Database Management Studio will not allow you to save the changes.
This is caused by a configuration setting that default results in the following dialog:
When you design a table in a database and then try to make a change to a table structure that requires the table to be recreated, the Database Management Studio will not allow you to save the changes.
This is caused by a configuration setting that default results in the following dialog:
 Error dialog
This dialog states: "Saving changes is not permitted. The changes you have made require the following tables to be dropped and re-created. You have either made changes to a table that can't be re-created or enabled the option Prevent saving changes that require the table to be re-created."
You can only react clicking the Cancel button.
And than Management Studio shows this dialog:
And than Management Studio shows this dialog:

So what you want to do to configure the setting with the value you want (IMHO should be the default setting!).
Go to: Tools > Options
Go to: Tools > Options
 Tools menu choose Options
Select the tab Designers and choose Tables and designers

And uncheck the option: "Prevent saving changes that require table re-creation".
Once you now save changes it will work.
Once you now save changes it will work.
Monday, November 14, 2011
Nokia Secret Codes
Nokia Secret Codes
*#06# for checking the IMEI (International Mobile Equipment Identity).
*#7780# reset to factory settings.
*#67705646# This will clear the LCD display(operator logo).
*#0000# To view software version.
*#2820# Bluetooth device address.
*#746025625# Sim clock allowed status.
#pw+1234567890+1# Shows if sim have restrictions.
*#92702689# - takes you to a secret menu where you may find some of the information below:
1. Displays Serial Number.
2. Displays the Month and Year of Manufacture
3. Displays (if there) the date where the phone was purchased (MMYY)
4. Displays the date of the last repair - if found (0000)
5. Shows life timer of phone (time passes since last start)
*#3370# - Enhanced Full Rate Codec (EFR) activation. Increase signal strength, better signal reception. It also help if u want to use GPRS and the service is not responding or too slow. Phone battery will drain faster though.
*#3370* - (EFR) deactivation. Phone will automatically restart. Increase battery life by 30% because phone receives less signal from network.
*#4720# - Half Rate Codec activation.
*#4720* - Half Rate Codec deactivation. The phone will automatically restart
If you forgot wallet code for Nokia S60 phone, use this code reset: *#7370925538#
Note, your data in the wallet will be erased. Phone will ask you the lock code. Default lock code is: 12345
Press *#3925538# to delete the contents and code of wallet.
Unlock service provider: Insert sim, turn phone on and press vol up(arrow keys) for 3 seconds, should say pin code. Press C,then press * message should flash, press * again and 04*pin*pin*pin# \
*#7328748263373738# resets security code.
Default security code is 12345
Change closed caller group (settings >security settings>user groups) to 00000 and ure phone will sound the message tone when you are near a radar speed trap. Setting it to 500 will cause your phone 2 set off security alarms at shop exits, gr8 for practical jokes! (works with some of the Nokia phones.) Press and hold "0" on the main screen to open wap browser.
Reading xml file in Javascript
Reading xml file in Javascript
var xmlDoc;
var nodedisplay="\n\n";
var idDisplay="\n\n";
var nameDisplay="\n\n";
if (window.ActiveXObject)
{
xmlDoc=new ActiveXObject("Microsoft.XMLDOM")
xmlDoc.load("menus.xml")
getValuesie();
}
else if (document.implementation && document.implementation.createDocument)
{
xmlDoc=document.implementation.createDocument("","",null);
}
function getValuesie()
{
nodes=xmlDoc.documentElement.childNodes
for(var i=0;iIn the body ....there are three span's with ids....in each span ...after the span tag closed in script, write the following code...
if (document.implementation && document.implementation.createDocument)
{
document.getElementById("nodeValue").innerHTML=afor();
}
if (document.implementation && document.implementation.createDocument)
{
document.getElementById("idValue").innerHTML=bfor();
}
if (document.implementation && document.implementation.createDocument)
{
document.getElementById("nameValue").innerHTML=cfor();
}
Here I am trying to read a xml file using javascript and displaying it's tag value and attribute values
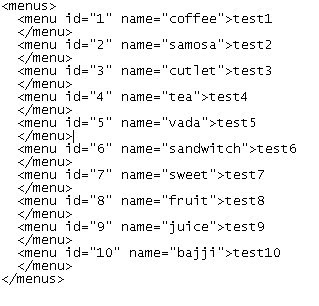
menux.xml file is as follows....

In javascript the following functions will be using for reading xml file...
var xmlDoc;
var nodedisplay="\n\n";
var idDisplay="\n\n";
var nameDisplay="\n\n";
if (window.ActiveXObject)
{
xmlDoc=new ActiveXObject("Microsoft.XMLDOM")
xmlDoc.load("menus.xml")
getValuesie();
}
else if (document.implementation && document.implementation.createDocument)
{
xmlDoc=document.implementation.createDocument("","",null);
}
function getValuesie()
{
nodes=xmlDoc.documentElement.childNodes
for(var i=0;i
In first span with Id of "nodeValue"
if (document.implementation && document.implementation.createDocument)
{
document.getElementById("nodeValue").innerHTML=afor();
}
next span with the Id of "idValue"
if (document.implementation && document.implementation.createDocument)
{
document.getElementById("idValue").innerHTML=bfor();
}
last span with the Id of "nameValue"
if (document.implementation && document.implementation.createDocument)
{
document.getElementById("nameValue").innerHTML=cfor();
}
Subscribe to:
Posts
(
Atom
)